


 MENU
MENUIn this video we will demonstrate how to export images and animations from Tecplot 360.
Once you have your plot looking the way you want it, you can show it off by exporting your plots as images or animations.
Image Export Options
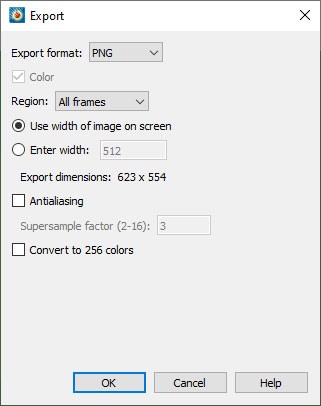 You’ll see the image export options under File > Export. This dialog has multiple vector and raster image export options. Vector formats such as EPS or PostScript are ideal for line plots, while raster formats are ideal for 2D and 3D plots – especially plots using continuous contouring or translucency. PNG is the recommended raster format today due to its combination of high image quality and small size on disk. You can specify the region to export from the following:
- Current frame – exports the frame highlighted in your plot.
- All frames – exports all frames on your plot.
- Work area – exports everything within the grey workspace.
The default in Tecplot 360 is to export all frames.
You can specify several other details for your export:
- Specify the exact width of your image. There is a blog on our website titled Best Formats for your Tecplot Images that talks more about image export formats.
- Toggle on anti-aliasing for smoother lines and text in the final output. A value of three should be sufficient for most images. Anti-aliasing requires more graphics resources which can cause the image generation to take longer.
- Full details for exporting images can be found in the Tecplot 360 User’s Guide, Section 25 (html)
Animation Export Options for Unsteady Simulations
There are other export options available for unsteady or transient simulations. Open the Time Animation Details dialog by clicking the Solution time gear icon in the Plot sidebar. Then click the filmstrip icon ![]() that will open the animation Export dialog. You can choose one of the video formats, or you can export as a sequence of images. This is the same export dialog we used to export a single image, and the same options are available.
that will open the animation Export dialog. You can choose one of the video formats, or you can export as a sequence of images. This is the same export dialog we used to export a single image, and the same options are available.
Clicking on the Animate drop-down main menu gives a list of the animation options in the dataset. You can see that in this dataset, we have animation options for iso-surfaces, slices, and streamtraces. Each of the dialogs launched from here will also have the filmstrip icon as seen previously in the Time Animation Details dialog. There are also options for Time because this is a transient dataset. And last, there is an option for Key Frame Animation, which allows you to append multiple 3D Cartesian views. Key Frame Animation is a great way to show off a cool 3D perspective change in our dataset.
One last export option is a simple copy and paste. Select one or more frames, and copy using right-click or control-C. Then use control-V to paste the image or images into a Word document or PowerPoint presentation.
This concludes the tutorial on exporting images and animations. Thank you for watching!