


 MENU
MENUThis video will show you the different types of text you can add to your plot, how to format the text, and, if you plan to add the same text to many different plots, how to use a quick macro to save time.
Plot Text Details
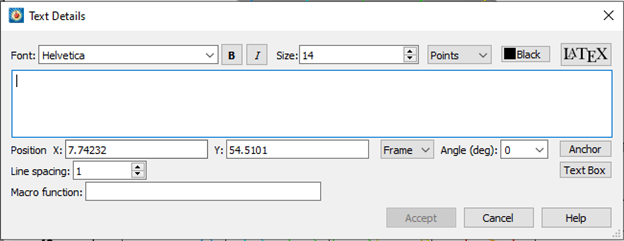
You can add text to your plot with the Text Details dialog. Choose Insert>Text from the main menu or click the ![]() text tool in the Insert Toolbar and click inside your plot. Then simply type your text into the text field. You can set the Font, Size, color, position, angle, and more from this dialog.
text tool in the Insert Toolbar and click inside your plot. Then simply type your text into the text field. You can set the Font, Size, color, position, angle, and more from this dialog.
Greek, math, and super or subscript fonts can be added as well using tags. See the Text section of the User’s Manual for more detailed information about using tags. Please note that the ability to format your text will depend on the fonts installed on your system.
User-defined characters, or keyboard characters can also be imbedded. See the section of the User’s Manual on Custom Character and Symbol Definition for more information on defining your own characters.
Clicking LaTeX will allow you to add LaTeX fonts (if you have them installed). See our separate video on using LaTeX Fonts for more information on that.
You can set the position for the text on your plot and can align the text using the Anchor. The surrounding text box can also be formatted.
Adding Dynamic Text
If I want to add a label for the Solution Time, I will take advantage of dynamic text. Type the following to reference the solution time: &(SOLUTIONTIME), and as I step through the time steps in the simulation, you can see the text update. Now, the formatting is a little bit longer than what I want, so I can shorten the string by formatting the text. You will find all the dynamic text formatting options in the Tecplot 360 User’s Manual, Section 18 – 1.5 on Dynamic Text. There is a lot of flexibility in how you can add text and format it.
Customizing Workflows
If you want to avoid typing the same formatted text that you use frequently, you can register a macro on the Quick Macro Panel. Here, I can just double click on the macro, and a text box is added with the formatted Solution Time text. If you’re doing repetitive actions like this, using the Quick Macro Panel to customize your workflows can be a huge time saver. We have another video to show you how to create Quick Macros, or in this KB article.
This concludes the tutorial on adding Text to your Tecplot 360. Thank you for watching.