


 MENU
MENUHere’s a Tecplot Tip that requires a bit of Tecplot “Kung Fu” – but our customers love it!
Tecplot 360 is designed to read and display numeric data, but sometimes you may have categorical data that is best represented using names. We call this a Materials Legend. An example of this type of data is a groundwater simulation in which scalar values refer to materials such as rock, sand, and water. Another example is an internal combustion simulation where the particles have different states: Not in wall film, In wall film, rebounded, etc.
While categorical data is not the primary design target, Tecplot 360 can display this information in the Contour Legend using Custom Label Sets. Custom labels are text strings contained within a data file or text geometry file which define labels for your axes or contour table. You may select Custom Labels anywhere you can choose a number format. The result is the text strings in place of numbers. There is more information on Custom Labels in our documentation:
- Section 6 – 7.1 Specify Number Format – Tecplot 360 User’s Manual
- Section 4 – 3.5 Custom Labels Record – Tecplot 360 Data Format Guide
Creating Custom Label Sets
Our goal here is to create a legend which displays the names associated with the DP_film_flag variable values in a CONVERGE dataset (from Convergent Science). The CONVERGE documentation defines the values of DP_film_flag as shown in the table below.
| Value | Meaning |
| 0 | Not in wall film |
| 1 | In wall film |
| 2 | Rebounded |
| 3 | Splashed |
| 4 | Separated |
| 5 | Stripped |
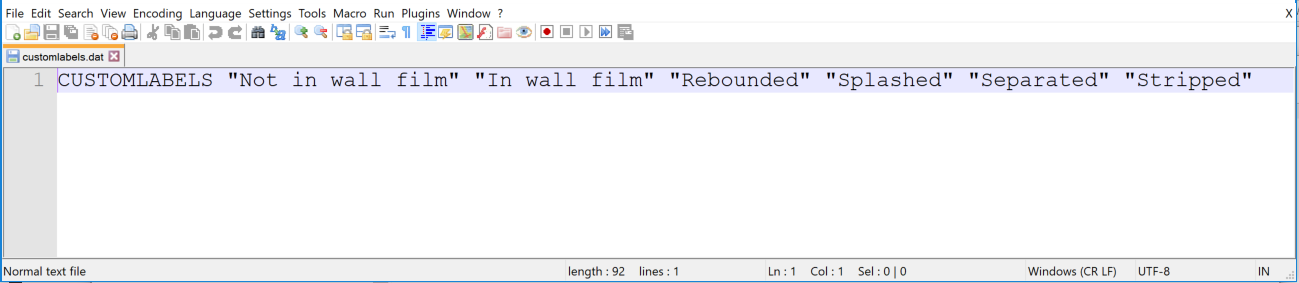
Figure 1. Custom Label Sets
Custom Label Sets are a way of assigning strings to (1-based) positive integer values. A custom label set can be a simple one-line file containing the strings that you want to associate with the values. You can then load this data file with your simulation data.
The first string is associated with the value 1, the second string with the value 2, and so on. Since the DP_film_flag values start at zero, we have to create a 1-based copy of this variable, which I will demonstrate below.
Part 1: Initial setup
- Load the files: tec000050.plt and customlabels.dat. Download the ZIP file below to find the files.
- Create a new variable called Film Flag which is a 1-based version of DP_film_flag. This new variable will be used to color the particles.
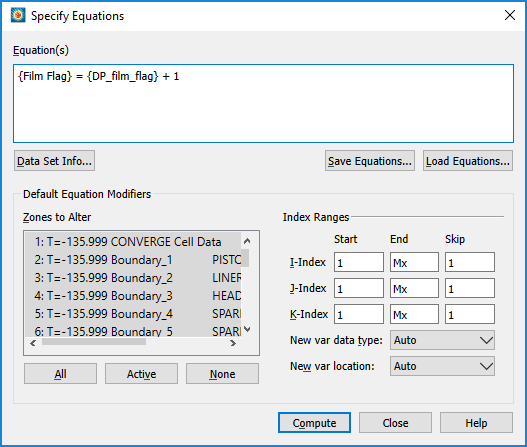
Figure 2. Specify Equations dialog
- Adjust the plot style to display the spray zone, colored by Film Flag and shaped as Octahedron (Octahedrons are faster to draw than Spheres and easier to see than Points. We’ll use the Sphere shape for the final output). Watch this 2-minute video tutorial on displaying spray particles.
In Figure 3, you can see distinct colors, but it’s difficult to know which particles are In wall film or Rebounded by looking at numbers. We want to see the names on the legend, instead of the numbers.
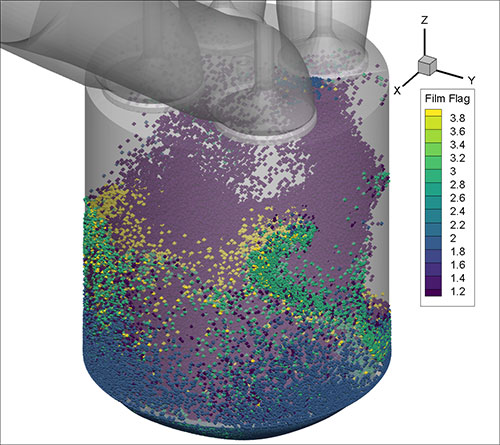
Figure 3. Adjusted Plot Style: display the spray zone, colored by Film Flag and shaped as Octahedron.
Part 2: Adjusting the Contour Legend to create the Materials Legend
- Double-click on the contour legend and set the contour levels to integer values 0-6. The zero value ensures we have an extra color band at the bottom of the legend.
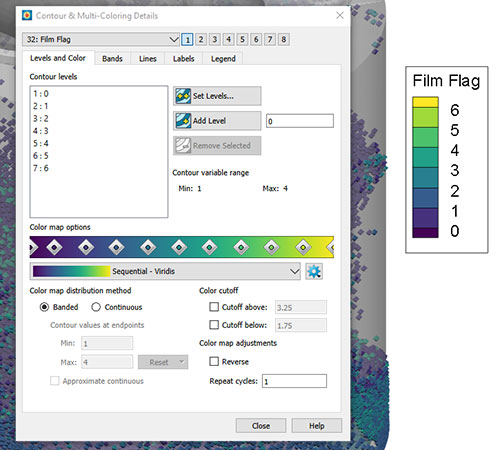
Figure 4. Contour Details dialog
- Display the string values on the legend: Select the Legend page and click on the Number Format… Now, In the Specify Number Format dialog choose Custom set 1, and change the Prefix and Suffix fields as shown below. Using the <sub> and </sub> notation is a trick to align the strings with the center of the color, rather than at the division of the color band. Make the font Bold to increase the size and weight of the font, because the subscript notation reduces it.
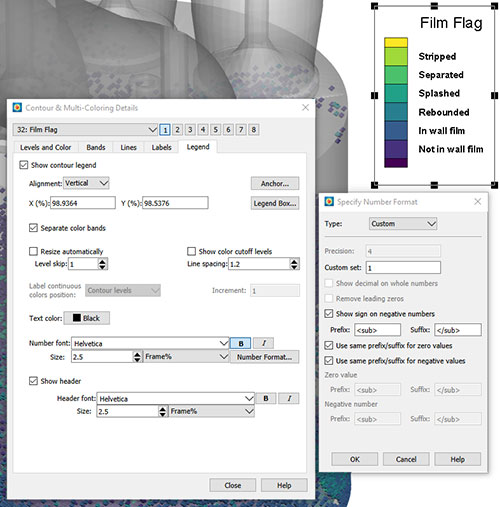
Figure 5. Display string values on the legend in the Specify Number Format dialog.
- Now, Adjust the end points of the legend to white so they blend into the background. Start by unchecking Separate color bands.
- Next, open the Legend Box… and set Legend Type to Fill with Fill color set to White.
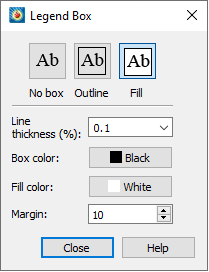
Figure 6. Legend Box Dialog
- To make the end-points of the legend white, use the Override band colors feature from the Bands page. Override the band spanning 0-1 and the band spanning 7-8.
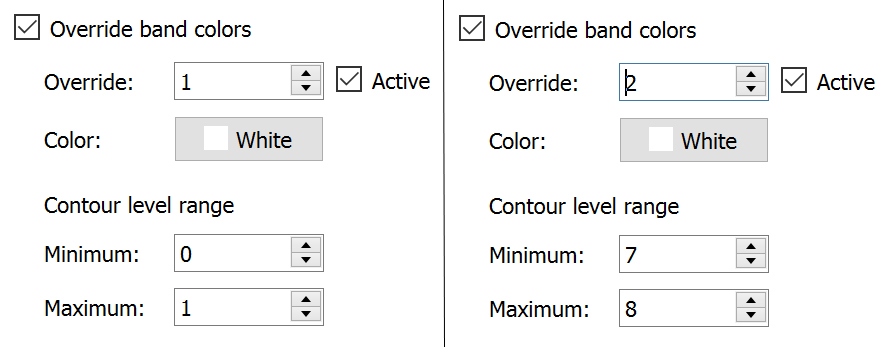
Figure 7. Override band colors option
- The contour legend should now appear as the adjusted Material Legend for the Film Flag.
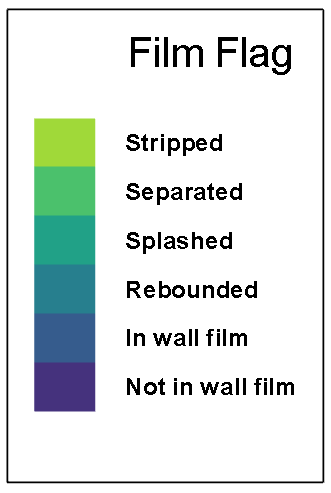
Figure 8. Adjusted Film Flag Legend
- To further distinguish the colors of each material you have two options:
- Use additional band overrides to define specific colors for each level.
- Choose a different colormap (or create a custom colormap – see Materials_Legend.py in the supplied files). For this dataset, the Qualitative – Dark 2 colormap does a pretty good job of distinguishing between the different values.
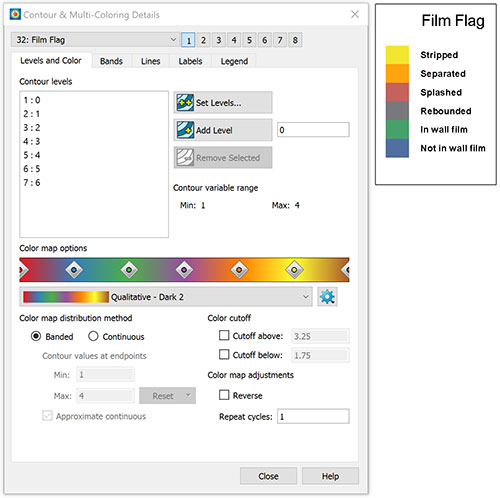
Figure 9. Qualitative Dark 2 colormap
And here is your final image.
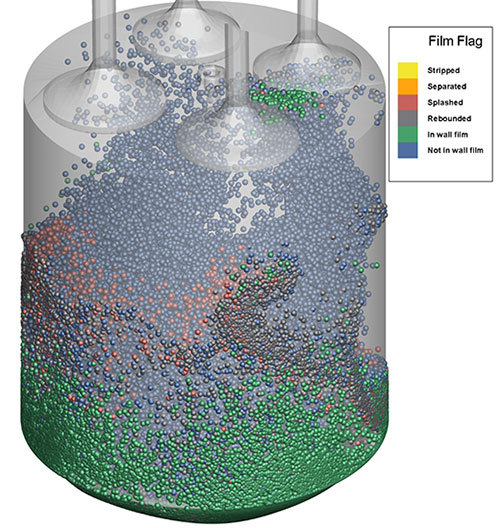
Figure 10. Final Image – Materials Legend for the Film Flag