


 MENU
MENUGetting Set Up
This post is the first in a series about running Tecplot 360 on the Amazon Web Services (AWS) cloud compute resources. As high-performance computing (HPC) workloads and computational fluid dynamics (CFD) computations are increasing in size the need for resources is growing. Use of cloud compute resources is a natural path to satisfying this growing demand. Fortunately, you aren’t limited to running your simulations in the cloud, you can do your postprocessing there as well.
The goal of this article is to help you attain a level of comfort working in the cloud, with emphasis on ensuring your experience is at least as good as on a local machine: installing the needed software quickly and tailoring RAM, SSD, CPU and GPU resources to your needs.
The setup showcased in this guide consists of a small AWS compute instance functioning as license server, a larger AWS compute instance for running Tecplot 360, and a GUI accessible via NICE DCV.
Quick Links to Major Sections

Astrid Walle, the author of this article, is a mechanical engineer with a PhD in CFD and more than a decade of experience in applied fluid mechanics. She has held several positions in gas turbine aeromechanics, R&D and AI development at Siemens Energy, Vattenfall SE and Rolls Royce. As a recognized industry expert she has recently taken on the challenge of starting her own business, CFD Solutions. As a freelancer, Astrid is following her professional determination to combine numerical simulation and data analytics.
Before You Get Started
Create an AWS Account
Before you can start, you need to create a user account on AWS. Your account will come with 12 months of free tier access, which you can also use for your postprocessing jobs. Also, you need to install and make yourself familiar with the AWS CLI on your local machine. Additionally, you might want to:
- Create an IAM role instead of using your AWS root user.
- Select the appropriate AWS region for your postprocessing. All instances for the setup described in this guide need to be launched in the same region.
Obtain a Tecplot 360 Network License
This how-to guide requires a Tecplot 360 network license (single or multi-facility), as network licenses are required when running on virtual machines. The license server information, which is needed for issuing the license file, we will get later in this guide.
Create SSH Key Pairs
For accessing your created AWS Virtual Machines later on without having to enter credentials, you need to create a ssh key pair on your local machine. On Linux/Mac this works with ssh-keygen. On Windows you can use a client like PuTTY. More information can be found in the Tecplot 360 User’s Manual and in the AWS documentation.
Once you’ve created your public and private keys, following the steps in the Tecplot 360 User’s Manual or AWS documentation, you’re ready to import the SSH key pair to AWS.
Now you go to the AWS Console (Figure 1) check the settings for user account (1) and region (2) and select Services (3) -> EC2 -> Network & Security (4) -> Key Pairs (5) -> Import Key Pair (6).
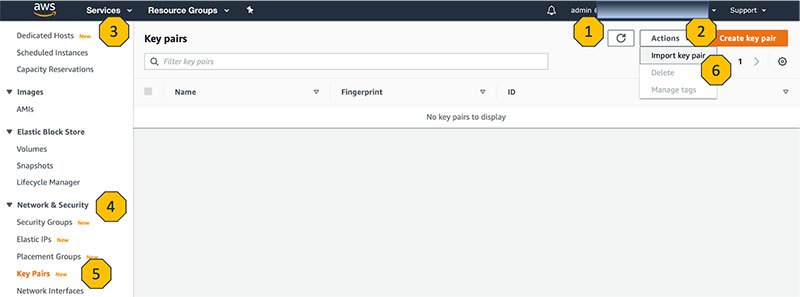
Figure 1: AWS Console EC2 – Network & Security – Key pairs
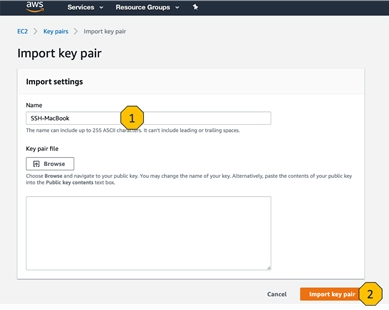
Figure 2: AWS console Import key pair
In the new dialogue (Figure 2), you should give a unique, recognizable name (1), paste the content of the public key file, which you created on your local machine (default path .ssh/id_rsa.pub or C:\Users\<username>\.ssh\id_rsa.pub) and import it (2).
Set up the Tecplot 360 License Server
To run Tecplot 360 on AWS you first need to create a small compute instance that will act as your license server. This does not need much power and can even take advantage of the AWS free tier of compute instances.
To set up the compute instance for your license server (Figure 3), go to Services (1), select EC2 and then Launch Instance (2). If you need to start an instance more often you can of course script the procedure, but for explanation here, I will describe the manual process.

Figure3. AWS Console-EC2 Launch Instance
First, select the AMI you want to have installed on your instance (Figure 4). There are many AMI’s available. You can search for them (1) and then select the desired one (2). You should just keep in mind, that some license managers have strict OS requirements, so you need to check that upfront. For the Tecplot 360 license manager Ubuntu is fine.
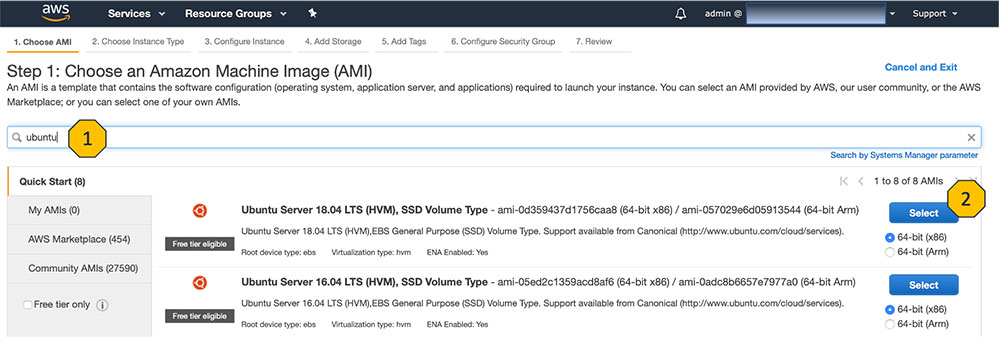
Figure 4. AWS Console AMI Selection
In the next step, you need to select the instance type. Here you can find a table listing the specifications and prices. As the license manager does not need much compute resources and because we want to make use of the free tier, select the t2.micro instance (1).
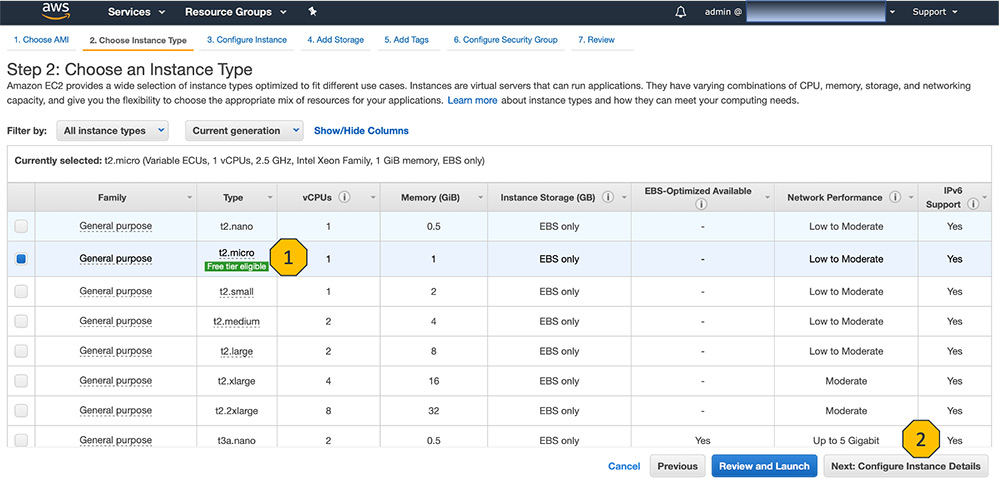
Figure 5: AWS Console Instance Type
In the next step for configuring the instance details (EC2), stick to the default settings.
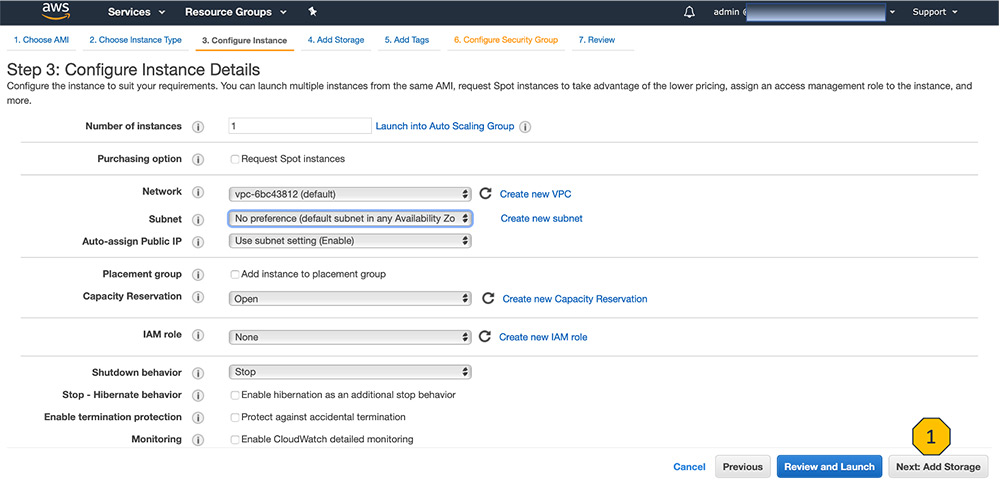
Figure 6: AWS Console Configure Instance Details
For the storage selection (Figure 7), 8GB (1) is sufficient for our needs. You will just need to select encryption (2) to increase data security.
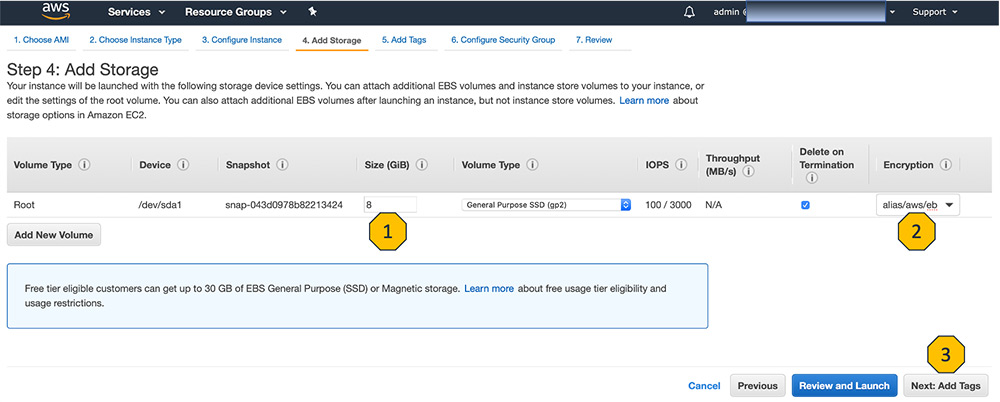
Figure 7: AWS Console Add Storage
Adding tags (Figure 8) is recommended for any cloud project because these tags are searchable and can help a lot with the bookkeeping.
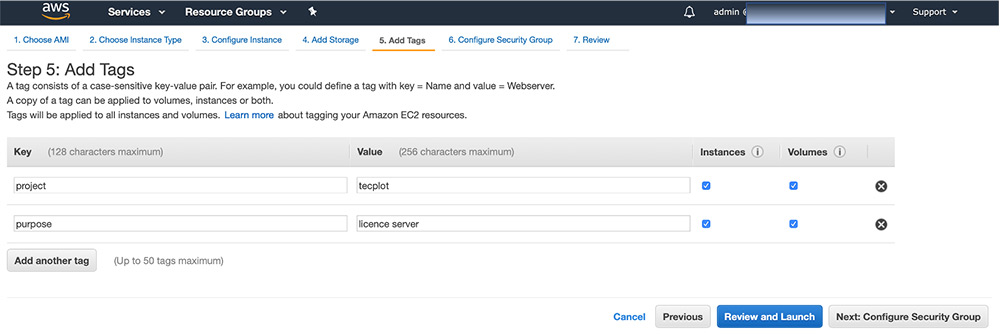
Figure 8: AWS Console Add Tags
In the last step (Figure 9) we create a new security group to which your instance is added. This is for the ssh access from your local machine. Later on, we will also add another security group to ensure communication between the license server and the instance on which Tecplot 360 will run.
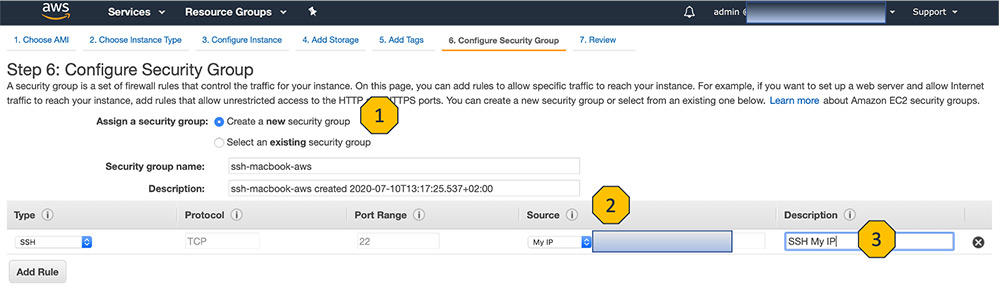
Figure 9: AWS Console Configure Security Group
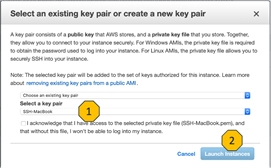
Figure 10: AWS Console Select Key Pair
When launching the instance, you will be asked for a key pair (Figure 10). Here you select the key pair generated earlier (1).
Now you are done with the setup! In the EC2 Instances view (Figure 11) you can see the details for your license server. To connect to the VM you will need the Public DNS (1).
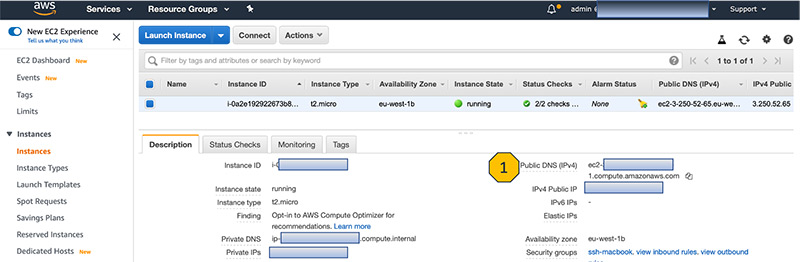
Figure 11: AWS Console EC2 Instances Overview
Configure the License Server
Now that your license server instance is running, you can install and run the Tecplot 360 license server.
First, connect to the VM via ssh. Depending on the selected AMI, the username varies. In our case it is ubuntu. Launch a command prompt and ssh to the machine.
> ssh ubuntu@ec2-<public DNS>
Now you need to get the installation files for the license manager. You can download them directly:
> wget https://tecplot.azureedge.net/products/rlm/12.4/rlm12.4_linux64.sh
Once downloaded you will need to change permissions and ownership of the installer, and then run it.
> sudo -i && chmod ug+x rlm12.4_linux64.sh
> ./rlm12.4_linux64.sh
After the RLM installation, in the installation directory, there will be a file named myhostids.txt.
This file contains all necessary information required for issuing the network license file. Send the contents of myhostids.txt to support@tecplot.com and they will generate a license file for you. After you receive your license file, you can place it into the RLM directory and start the RLM.
> ./rlm_process start
Check the logfile teclmd.log to ensure that the license manager is running correctly.
Set up AWS Parallel Cluster
This guide focuses on simplicity and user experience, so the selected setup is based on the AWS service parallelcluster. This is not only the perfect service for easily deploying your compute fleet in the cloud, but it also comes with NICE DCV – high performance remote desktop and application streaming – and that’s what we want to take advantage of.
A good overview and workshop for getting started with parallelcluster can be found here.
This will require a number of steps to setup:
- Create a new security group so our license server and parallel cluster can communicate securely.
- Create an AWS Cloud9 instance, which is used to configure the parallel cluster
- Configure the parallel cluster itself.
Create a New Security Group
And now we go back to the AWS console (Figure 12) to create a new security group, in which we allow all inbound / outbound traffic from and to this security group itself. As this is not totally straight forward, here are the steps listed to achieve the correct settings:
- Create a new security group with dummy inbound and outbound rules
- Edit the security group inbound and outbound rules to Type: “All traffic” and Destination: Custom, selecting this security group from the search field.
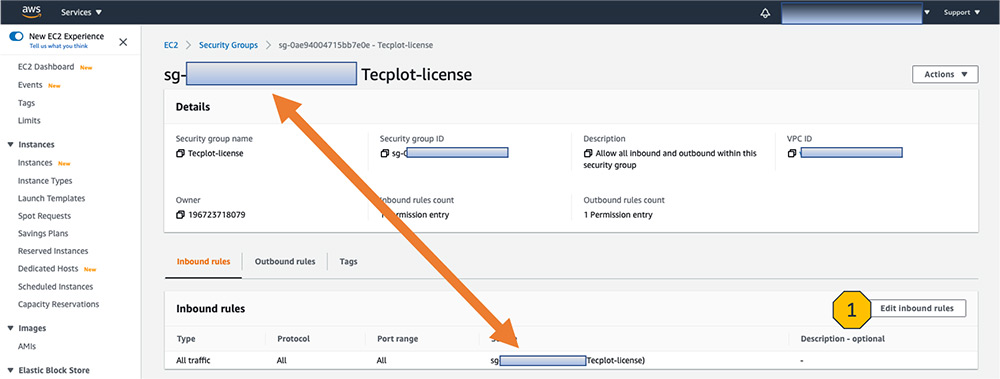
Figure 12: AWS Console Additional SG
And then we add our license server EC instance to this security group. Also we add the compute instances on which we will launch Tecplot 360 to this security group (Figure 13). By doing so we ensure a secure connection between our instances.

Figure 13: AWS Console Change SG
Create the Cloud9 Instance
A Cloud9 instance gives you a web-based console which can be used for configuring your AWS parallel cluster. To create this instance, use the AWS search to find Cloud9 (Figure 14). And click on “Create environment” (Figure 15).
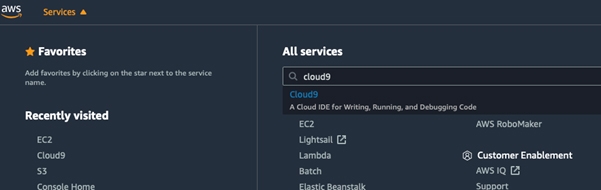
Figure 14. AWS console All Services

Figure 15: Cloud9 Create Environment
For creating an environment, we need to provide a name and description (not pictured). Apart from that we can stick to the default settings (Figure 16). That includes the t2.micro instance (1) again, which is free tier eligible, also the instance will be stopped automatically when idle for more than 30 minutes (2). And remember to give tags for this instance as well (3), something like “project=Tecplot”.
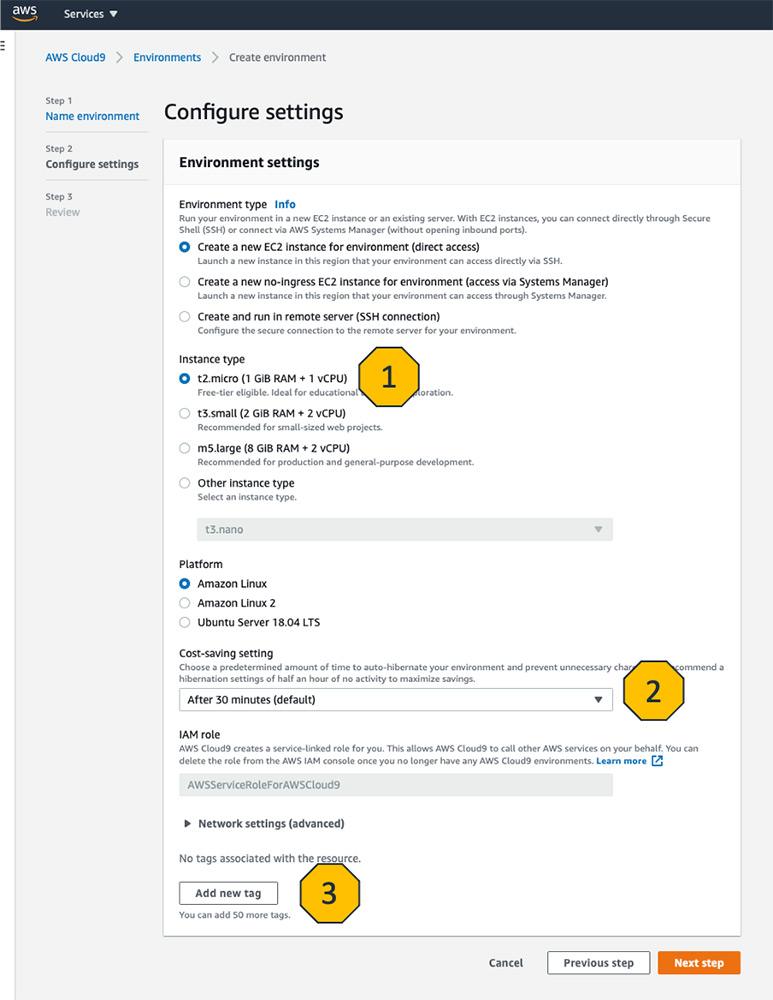
Figure 16: AWS Console Settings for Cloud9 Instance
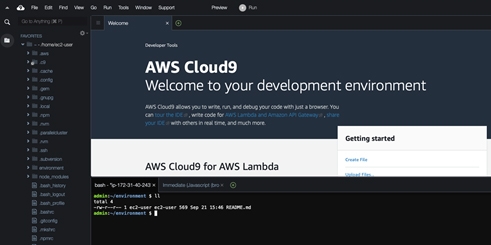
Figure 17: AWS Cloud9
Once you’ve confirmed creation of the Cloud9 instance it will open the IDE in the browser (Figure 17). For configuring our Cloud9 instance and preparing the launch of our parallelcluster we start with the installation of AWS CLI and parallelcluster as well as the creation of a ssh key-pair:
> pip3 install awscli -U --user
> pip3 install aws-parallelcluster -U --user
> aws ec2 create-key-pair --key-name lab-2-your-key --query
  KeyMaterial --output text > ~/.ssh/id_rsa
> chmod 600 ~/.ssh/id_rsa
(If pip3 is not already installed on your Cloud9 instance, you can call python3 –mpip instead.)
Create the Parallel Cluster
To access a parallel cluster on AWS effectively requires three steps:
- Configure
- Create
- Connect
Configure the Cluster
The first step in creating an AWS parallel cluster is the creation of a config file which defines how the cluster is to be set up. A step-by-step guide can be found here and the documentation for all options here. Also there is a sample file attached to this article or available on GitHub, with which you can get started. A good starting point can be obtained by running:
> pcluster configure
pcluster configure will prompt for information such as Region, VPC, Subnet, Linux OS, and head/compute node instance type. Read on to understand these settings.
The important information about your Region, VPC and Subnet which need to be set in the config file can be looked up in the AWS Console in the description for your Cloud9 instance.
In the EC2 instances (Figure 18) overview (1) you should ensure that your Cloud9 instance (2) is in the same VPC and subnet (4) as your license server. These are exactly the values you also need to provide for your parallel cluster and the head node on which we will install Tecplot 360.
You can also get these values directly from the command line in the Cloud9 console using the commands, as described here:
> IFACE=$(curl --silent http://169.254.169.254/latest/meta-data/network/interfaces/macs/)
> SUBNET_ID=$(curl --silent http://169.254.169.254/latest/meta-data/network/interfaces/macs/${IFACE}/subnet-id)
> VPC_ID=$(curl --silent http://169.254.169.254/latest/meta-data/network/interfaces/macs/${IFACE}/vpc-id)
> REGION=$(curl --silent http://169.254.169.254/latest/meta-data/placement/availability-zone | sed 's/[a-z]$//')
Once you’ve run these commands you can check the contents using the echo command:
> echo $IFACE
> echo $SUBNET_ID
> echo $VPC_ID
> echo $REGIONM
Also we want to use DCV Viewer later on to access a graphical desktop session, so we need to add a line in the compute section and a respective dcv section to the config file as well:
dcv_settings = default
[dcv default],
enable = master
Depending on your priorities you should pay special attention on the selection of the instance types for head node and compute fleet. Here you can go for a lot of compute power or you can go for free with t2.micro. Although this is not the recommended instance type to use with DCV Viewer, it does work with low compute load. So it’s a good choice if you just want to get started and give it a try at no costs. Here you can find more examples and explanation for the usage of DCV Viewer with AWS instances. The default location for the config files is in ~/.parallelcluster/.
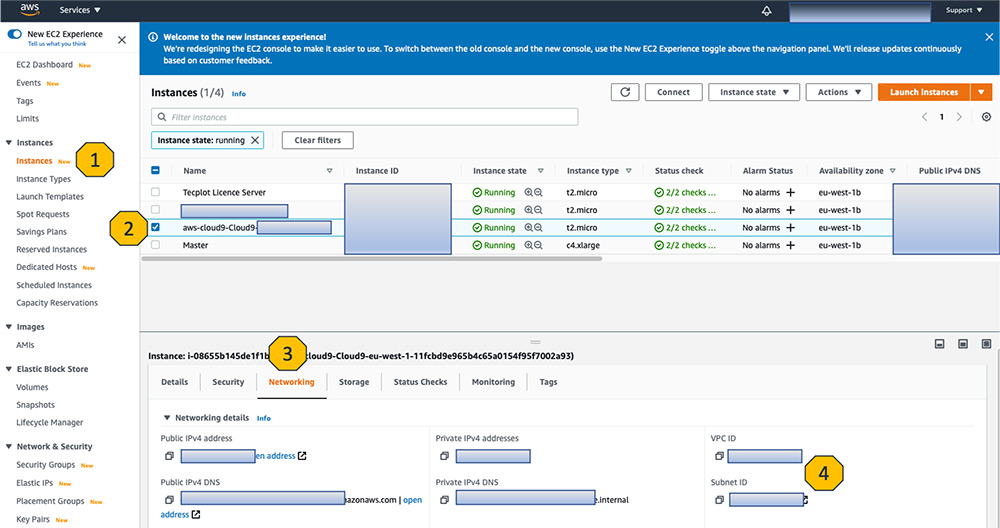
Figure 18: AWS Console check Cloud9 Instance
Create the Cluster
So, with the parallelcluster config file ready, we can start the head node as simple as
> pcluster create my-cluster -c ~/.parallelcluster/config
The creation will take some minutes, you can check for the status
> pcluster status my-cluster
Connect to the Cluster
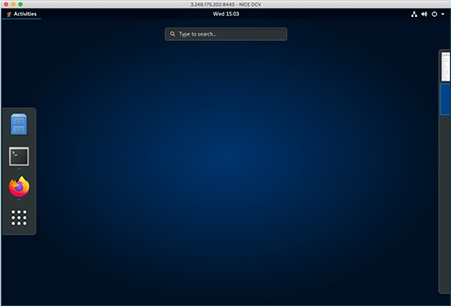
Figure 19: Head node access via Nice DCV
When the creation is completed, you can connect to the head node either via ssh
> pcluster ssh my-cluster
But we want to connect via NICE DCV to be able to access the graphical desktop session (don’t forget to enable DCV in ~/.parallelcluster/config).
> pcluster dcv connect my-cluster
This command will either open a browser window on your machine or will display a URL in the terminal, which you can copy & paste into your browser (Figure 19).
Another possibility for further improving the user experience due to easier handling of keyboard, mouse and shortcut inputs is the usage of the NICE DCV native client, which is available for Linux, Windows and Mac and where you can establish the connection with the same provided URL.
Install Tecplot 360 on the Cluster
Now we can start with the Tecplot 360 installation just as if we were on a local machine with a clean OS, but already with AWS CLI and the right credentials installed to access your AWS services, e.g., S3.
Since this is a clean OS you might want to start with installing a browser to download the Tecplot 360 installation files, then you can perform the installation as described in the Tecplot 360 Installation Guide. After starting Tecplot 360, provide the hostname of your license server which can be found in the myhostids.txt (Figure 20) or enter the command hostname on the license server VM. And now you are ready to go!
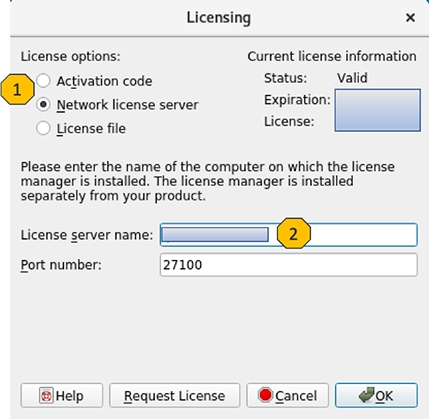
Figure 20: Tecplot 360 licensing window
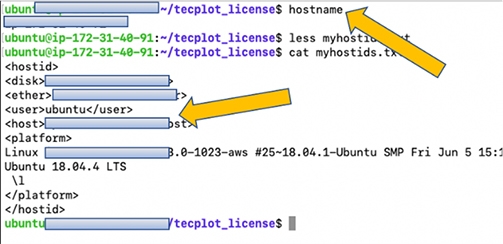
Figure 21: license server VM hostname
What’s Next?
If you have all your postprocessing scripted and you don’t need GUI, then stay tuned for the next part where we will also discuss this possibility. Besides other possible setups we will also look at best practices for getting your installation files, simulation and postprocessing results uploaded and downloaded. Also, we discuss how the entire process can be designed to save costs and time.